Pages

Thursday, March 21, 2013

Paper Pumpkin Club on Trial


The Paper Pumpkin Club is  basically a Birchbox for stampers.  Each month you will receive a box of Stampin Up goodies to make a few cards.  It's personal card making time in a box.  Well, I love card making and Stampin Up products, so what the heck, let's give it a try.  I contacted Wendy and told her to sign me up.
 
Anyone who signed up with Wendy Cranford of Luvin Stampin Up, would receive an eXtra special treat from her just for signing up.  She sent me a case to house all my Paper Pumpkin stamps for the year.


Totally adorable.  This little case really got me hyped and super excited about the club.


Inside the case was another surprise- these cute samples from Stampin Up. (I love the punch dresses.)  I could hardly wait until the arrival of my first Paper Pumpkin.  I began counting the days.


Last week my first Paper Pumpkin finally arrived...


with this cute little welcome letter.
 
 
Now to the goodies.
 
 
After opening the crisp white tissue paper wrapping, this was what I discovered inside.


Hmmm.....my excitement started declining. 


These are stickers. Where's the real mini spool of ribbon, and where were the real starbursts cut from a Stampin Up punch?  I was expecting the quality that I got from Wendy from her samples.

 
I sorted through all the contents to make sure I had what I needed to make the four cards.  Yes, FOUR cards!  Everything was there.  So I got busy, and in less than 15 minutes, this was the end product.
 

I admit, I was not totally impressed with my first Paper Pumpkin box.  It just didn't appear to be quality paper.  The stamp was ok.  The ink pad was ok. The buttons were ok. But the rest was a total thumbs down.
 
 
Yes, I was totally disappointed (Have I said that already?) with my first Paper Pumpkin kit, but I am not one that gives up so easily.  So, I'll hang with them for three months.  Honestly, if quality doesn't improve, I will not be a repeat customer for the "Birchbox for Stampers."
 
 
On a happy note, one of the third grade teachers and his wife are expecting a baby boy in a few weeks. Yay for babies~ He loves baseball and Ohio State. So we (the second grade team)  combined the two ideas and presented the family with these little gifts.


The items are all handmade by Tonya of Sweet Mia Boutique (except the cards. I picked those up from the Dollar bin at Target.)  She has a space at The Meeting Corner where I as well have a booth. She's great! 
 
So support 
Handmade!
Shop Small!
Shop Local!
 
 
Thanks for stopping by~


Tuesday, March 5, 2013

Seuss-tacular Thank You Cards: A How To

We are celebrating "Read Across America" this  week at school.  Each year during this time, we also have a school wide book fair.  I don't know about you, but the thought of hundreds and hundreds of children's books in one place make me giddy with excitement.  Each time the book fair comes to school, the teachers are fortunate enough to create a wish list of some sort.  Just the thought of books being added to my class library makes me super excited.

Well, over the past few years, I've only had maybe two books per book fair donated to my class library. Don't get me wrong, I'm always thankful for each and every book donated. But I wasn't going to set myself up hoping for lots and lots of books and then be let down.  So I didn't get my hopes up too high when the Spring book fair rolled around this year.

Last week, I grabbed my basket labeled with my name and "shopped" around the book fair and carefully placed books into my wish basket.  I chose books that would really supplement the new Common Core Standards and would create interest for my students. After my selections,  I placed my book basket in its designated place amongst the letter "M's" on the teacher shelf and didn't look back.

Well low and behold, the next day one book came in, the following day two more books came in.  Oh my goodness~ books and more books and even more books. My heart smiled a ginormous smile.

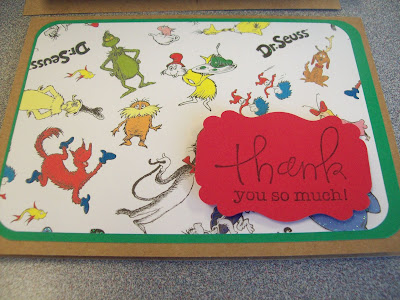
In honor of Dr. Seuss and the generous book donations from my kiddos (and their mommies and daddies), I arrived at school super early this morning to make these thank you cards.  I really wanted them to know how much I appreciated their thoughtfulness and generosity.


Want to make your own?  Here's how~

  • Gather your materials
 
 Dr. Seuss themed scrapbook paper. Jo Ann fabrics had it for 50 cents per sheet this week.
 
 
 Coordinating card stock.  When I think of Dr. Seuss, these are the colors I think of.
 
 
5 1/2" x 4 blank note cards (I'm partial to Kraft) , black stamp pad, thank you stamp of your choice, dimensionals
 

Cutting board, ATG or some type of adhesive, corner rounder (optional), tag punch
 
 
  I cut the colored card stock into 5 1/4" x 3 3/4" pieces.


 I cut the patterned Dr. Seuss paper at 5" x 3 1/2".
 
 
 I rounded the edges on the solid card stock and patterned paper.  I decided against rounding the edges of the Kraft blank card. I liked the hard edge. 
 
 
All the paper is cut.  I cut a 5 1/4" x 3 3/4" white piece for the insert for each card.
 
 
 I used this stamp to create a sentiment on red paper.
 
 
  I then used my EK Success tag punch to punch out the sentiments.


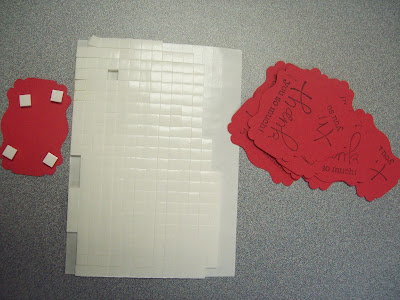
I added small dimensionals to the back of each sentiment.
 
 
I layered the pre-cut pieces onto the blank notepad.
 
 
I am impressed with the way the cards turned out.  After writing the thank-yous during my planning, I eagerly gave the cards to my kiddos to take home.  I heard one kiddo saying to another, "Wow, I got a special treat from Mrs. M. I can hardly wait to show my mom."  Insert <happy teacher.>


I hope you have a Seuss-tacular week~
 
 
Thanks for stopping by!


Related Posts Plugin for WordPress, Blogger...