Pages

Showing posts with label valentine's day. Show all posts

Saturday, January 25, 2014

Simple Valentine Treats for the Kiddos

Valentine's Day is right around the corner. I wanted a simple treat for my 47 second grade students for this special occasion. You read correctly- 47!  (It's because I team teach with an awesome gal! ) 

While looking through my Pinterest boards I came across this cute and simple treat. I was inspired to create my own.


 I pulled out my seasonal stamp stash and created this version.


The rubber stamps came from the dollar bin at Michael's a few years ago.  First, I cut some patterned cardstock from the Dollar Store business card size (2" x 3 1/2"), stamped the images, and then attached a piece of chocolate. I found 10 packs of pencil top erasers while cleaning out the attic during the Christmas holidays. I took the pink and purple erasers from the packs to add to the candy treat.
I placed the cards and erasers in a small plastic bag, and cut bag toppers from my Valentine paper stack.

The finished product~


All packaged and ready for my Second Graders~


Thanks for stopping by~

Wednesday, January 22, 2014

Meet Hot Lips: A Chair Makeover

Hubby Jagger bought me a subscription to the HGTV Magazine for Christmas.


While browsing through the magazine, I came to an immediate halt at this page.
WOW! is exactly right. This color is absolutely eye catching, fun, and BOLD.  I definitely wanted to paint something  Hot Lips by Benjamin Moore.


 I quickly texted my booth mate,Melodie, to inquire as to if she had a chair I could paint. (My furniture surplus is very low.) Yippee, she had this chair!  I made a quick dash to the local Ace Hardware to get a sample can of Hot Lips!
 

After a quick sanding, I applied a coat of white primer on the chair.


Then a coat of tinted primer. (I mixed some of the paint with white primer.) I could have easily just tinted the primer at the beginning, however the white, to pink, to hot lips color actually let me see missed spots.


Next came a seat cover choice.  I rummaged through my stash of scraps.  This is what I came up with.

Melodie suggested the black and white brocade as the first choice, however I didn't have enough scrap to completely cover the seat. Our next choice was...

CHEVRON!


I love the end result~


One last before and after~ 
Thanks for stopping by~

Friday, January 25, 2013

Paper Bag Valentines

Earlier in the week, the Capital City once again was forecasted to have yet another Winter Storm.  Read about last Friday's weather threat {here}

It was a crazy, CrAzY, CRAZY day at school.  To be proactive in anticipation of the storm,yesterday,  the school system I work for decided to release school 3 hours early today. Sounds great, right? Well after the start of the school day, we received yet another memo stating that school would now be released 4 hours earlier, no longer the 3 hours mentioned the previous day.  That meant our school would be released at 11:45 a.m.

So the mad dash was on-music, math, lunch, and dismissal. Once all the kiddos were on a bus, in a car, or headed to an afterschool program of some sort, I headed home.  The drive home that usually takes less than 10 minutes, took over 30 minutes due to a thin blanket of ice on the roads.

So now I'm perched on the bed in my comfy clothes, peering out the window, listening to Roseanne in the background, and sharing with you a fun, simple valentine treat.

Materials needed:
  • paper grocery bag
  • Hershey kisses
  • sewing machine
  • sentiment stamp of choice


Directions:

First, I cut out two heart shapes using my Cricut from a leftover paperbag.  You can definitely cut these out by hand. Kraft paper works well, too.

Next, I stamped a sentiment on the nonprinted side of each heart shape. An alternative to the stamp would be to write a handwritten message or sentiment.  My handwriting is not the best, so if I can find a stamp, I go with it.

Then, I sewed about 3/4 around the heart with red thread using my sewing machine.  I stuffed 3 Hershey kisses inside and finished sewing around the remaining 1/4 of the shape.

Finally, Share with a special person. (Tear to open.)

Super Easy and takes less than 5 minutes.


Another alternative would be to use decorative paper bags or scrapbook paper. The possibilities are endless. I personally love the look of the paperbag.  Be creative and have fun~

Now off to make some hot chocolate, load another episode of Rosanne, and enjoy the remaining extra time at home with my family! They're all home.


Thanks for stopping by~


Monday, January 14, 2013

Clean and Simple Origami Cards

Today I want to share with you an easy origami valentine card.


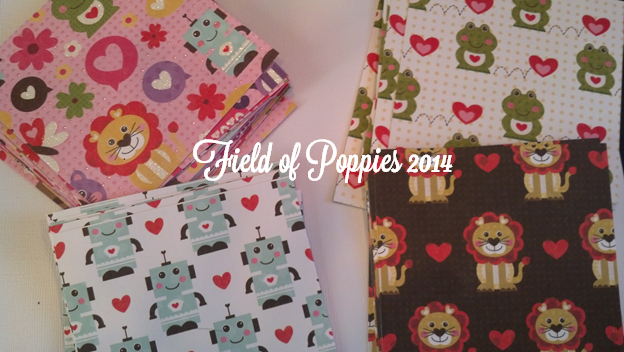
These are the materials I used.


I cut paper into 5 x 5 squares. (I purchased the paper from the dollar bin at Target.Then I followed this tutorial.


It didn't take long to make these.


I put the finished valentine's  through my sticker maker.  Double sided tape will work just fine so don't worry.  I placed a valentine on the front of kraft cardstock.  I bought a large pack of blank kraft cardstock cards on Black Friday for next to nothing at Michael's.  I stamped a sentiment onto the front.  I grabbed this stamp from the dollar bin at Michael's as well.
 
.
 
 I will be sending these cards to my gals in the Random Act of Kindness Card Club in which I belong. 


Thanks for stopping by~


Tuesday, February 14, 2012

Currently


Farley and Jen are two creative gals.  Their "Currently" gave me the boost to do my own. I really needed the "reflection" that it brings.  They even give you the instructions on how to do your own. 

The IRT at our school today challenged the staff to Pay It Forward by telling three people , "I Love You!" I don't do well with "verbal" words of affection but I managed to Pay It Forward to three others. What a great gesture for this day of L-O-V-E. Now its your turn: Pay It Forward- Tell 3 people you love them.

 Happy {Heart} Day~


Thursday, February 9, 2012

Ultimate Valentine Treat Holders

So you and the kids have made a few dozen Valentine's Day treats and have written many, many names on cute handmade valentines. Now these "cuties" need to be delivered to your son's second grade class, your daughters Girl Scout troop, or the mommy group that meets on Thursday mornings.  Now you need something cute and adorable to deliver them in.  Take a look at what I found...

Decorated shoe box from Nathan's Prayer

These tattle boxes from tissue boxes are interesting from Giggles Galore
A recycled ice cream container from Plaids Kids Crafts

Wednesday, February 8, 2012

I {heart} U~

While searching for cute Valentine's Day ideas, I found...

Love Bug Valentines by Dandee Designs

Button Art at Mama's Crafty Place
Valentine Faces by Blonde Designs

You're Out of This World by It Is What It Is

Swedish Fish by Faboolous
activities for kids Free Printable Valentine Valentines ~ 3D Smartie Pants! 
Smartie Pants by Tip Junkie

Friday, February 3, 2012

You've Got Mail

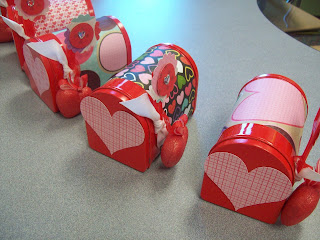
Is this not the one of the cutest mailboxes you've ever seen? These mini mailboxes make great gifts for your kids, friends, family, and co-workers for Valentine's Day.  I decorated these last year for the girls on our second grade team.  They loved them.  Very inexpensive and SUPER CUTE .  I found the mailboxes in the dollar bins at Target (great deal) and used a Valentine stack from Michael's and let the creative juices flow. Lastly, I filled them with yummy treats and a handmade card~


Need more inspiration?  Check out The Crafting Chicks here for a tutorial on how to make your own. Or check out this finished one by HappyScrapper5 on Splitcoaststampers.com.
Related Posts Plugin for WordPress, Blogger...